Essential Foundation: Mastering Machine and Hand Stitches
The cornerstone of any beautifully tailored garment lies in the structural integrity of its stitches. Whether you are operating a high-end computerized sewing machine or relying on the traditional art of hand sewing, understanding the mechanical and physical principles behind thread interaction is paramount. A perfect stitch is not merely a means of joining two pieces of fabric; it is a meticulously calculated balance of tension, thread weight, needle size, and operator skill. In this foundational section, we dissect the core mechanics of stitch formation, ensuring that even beginners can achieve factory-level durability and aesthetic perfection in their home studios.
Decoding the Tension Stitch for Beginners
Sewing machine tension is often the most intimidating aspect for novice sewists, yet it is the absolute most critical factor in achieving a balanced, durable seam. The tension stitch refers to the precise equilibrium between the upper thread (feeding through the needle) and the lower thread (feeding from the bobbin). When these two forces are perfectly matched, the threads interlock exactly in the middle of the fabric layers. If the upper tension is too tight, the bobbin thread will be pulled to the surface, creating visible loops and a weakened seam. Conversely, if the upper tension is too loose, the top thread will loop loosely on the underside of the fabric, leading to a phenomenon commonly known as “bird-nesting.”
To master the tension stitch, you must adopt a systematic approach to testing and adjustment. Always begin with a scrap piece of the exact fabric you intend to use for your project, as different weaves and thicknesses demand different tension settings. Thread your machine with two different colors—one for the top and one for the bobbin. This visual contrast will immediately reveal which thread is overpowering the other.
- Identify the Imbalance: Stitch a straight line. If the top color is visible on the bottom, tighten the top tension. If the bottom color is visible on the top, loosen the top tension.
- Incremental Adjustments: Never make drastic changes. Adjust the tension dial by half a number at a time, testing after each micro-adjustment.
- Needle and Thread Harmony: Ensure your needle size corresponds to your thread weight. A needle that is too small for a thick thread will cause friction, artificially increasing the top tension and skewing your results.
Achieving Professional Machine-Sewed Stitches
There is a distinct visual difference between a garment sewn by a home hobbyist and one crafted by a professional tailor. The secret to bridging this gap lies in the mastery of machine-sewed stitches. Professional stitches are characterized by their unwavering straightness, consistent length, and seamless integration into the fabric’s drape. Achieving this requires more than just pressing the foot pedal; it demands a holistic understanding of machine mechanics and fabric handling.
First, stitch length must be meticulously calibrated. A standard stitch length of 2.5mm is ideal for medium-weight cottons, but heavier fabrics like denim require a longer stitch (3.0mm to 3.5mm) to accommodate the fabric’s bulk without causing puckering. Delicate fabrics such as chiffon or silk demand a shorter stitch (1.5mm to 2.0mm) to prevent the delicate yarns from shifting. Furthermore, mastering the art of “guiding, not pulling” is essential. The feed dogs of the sewing machine are designed to pull the fabric through at a consistent rate. As the operator, your sole responsibility is to steer the fabric gently, keeping the raw edge aligned with the seam guide on the needle plate. Pulling the fabric from behind the needle will inevitably result in skipped stitches, broken needles, and stretched seams.

The Art of Invisible Sewing: Blindstitches and Hidden Buttons
True elegance in tailoring is often defined not by what you see, but by what you do not see. The art of invisible sewing elevates a garment from ordinary to bespoke, creating clean lines and uninterrupted silhouettes. This advanced skill set encompasses techniques designed to conceal the mechanical construction of the garment, focusing heavily on specialized hemming methods and discrete fastening systems. Mastering these techniques requires patience, precision, and an intimate understanding of fabric behavior.
Mastering the Blindstitch Detail
The blindstitch is the hallmark of high-end tailoring, used predominantly for hemming trousers, skirts, and formal wear where a visible stitch line would disrupt the aesthetic flow of the fabric. While it is called a “blind” stitch, achieving true invisibility is an intricate process that demands meticulous preparation. The core principle of the blindstitch is catching only one or two woven threads of the exterior fabric with the needle, ensuring that the thread does not penetrate entirely through to the public side of the garment.
To execute a flawless hand blindstitch, begin by properly finishing the raw edge of your hem with a serger or pinking shears to prevent fraying. Fold the hem up to the desired length and press it firmly. Roll the finished edge back approximately 1/4 inch. Using a fine, sharp needle and a single strand of high-quality polyester or silk thread, anchor your thread in the hem allowance. Take a microscopic bite of the main fabric—literally just a single yarn—and then pass the needle back through the folded edge of the hem allowance. Space your stitches approximately 1/4 to 1/2 inch apart. The tension of your thread is critical here; pulling too tightly will create visible dimples on the exterior of the garment, instantly ruining the invisible effect.
Sewing Invisible Buttons for Concise Designs
Modern minimalist fashion heavily relies on clean, uninterrupted lines, making visible buttons a design hindrance. Sewing invisible buttons—also known as hidden placket closures or internally anchored fasteners—requires a strategic approach to garment construction. This technique is frequently utilized in tailored blouses, sleek coats, and formal wear.
The most effective method for invisible buttoning involves creating a hidden placket. This requires an additional layer of fabric folded into the front closure of the garment. The buttonholes are sewn onto the interior layer of the placket, while the buttons are attached to the corresponding under-layer. When fastening the buttons, sew them with a thread shank. A thread shank provides the necessary space between the button and the fabric, allowing the thick layers of the hidden placket to sit flat without distorting the garment’s front profile. To create a thread shank, place a toothpick or a heavy tapestry needle over the top of the button while sewing it on. Once secured, remove the toothpick, wrap the thread tightly around the stitches beneath the button to form a solid pillar, and tie it off securely.

Professional Garment Modification: Hems and Trouser Adjustments
The ability to alter and modify existing garments is an indispensable skill for any home tailor. Ready-to-wear clothing is manufactured to fit a standardized, hypothetical body type, which rarely aligns perfectly with individual proportions. Therefore, mastering garment modification—particularly the adjustment of hems and trouser lengths—is essential for achieving a custom, personalized fit. This section delves into the precise methodologies required to execute seamless alterations that look entirely factory-original.
Flawless Skirt Hemming with a Sewing Machine
Hemming a skirt might seem straightforward, but achieving a perfectly level, pucker-free hem requires a structured approach, especially when dealing with flared, A-line, or circle skirts. The curvature of these skirts means that the raw edge of the hem is wider than the area it needs to be stitched to, creating excess bulk that must be carefully managed.
To hem a skirt easily and neatly without outside assistance, begin by letting the garment hang on a dress form or a hanger for at least 24 hours. This allows the bias-cut sections of the fabric to stretch and settle naturally. Next, use a hem gauge or a yardstick to measure the desired length from the floor up, marking the fabric with tailor’s chalk. For a machine-stitched hem, a double-fold method is highly recommended for straight skirts. Fold the fabric up 1/2 inch, press, and then fold up another 1 inch, pressing again. Pin perpendicular to the hemline. When sewing, use an edge-stitching foot to maintain a perfectly straight line exactly 1/8 inch from the upper folded edge. If you are hemming a curved skirt, run a line of basting stitches along the raw edge and gently pull the bobbin thread to gather the excess fabric slightly. This easing technique allows the wider raw edge to lay flat against the narrower interior of the skirt without creating unsightly pleats or puckers.
Easily Modifying Trouser Leg Lengths
Trouser alterations are the most common tailoring task, yet they are frequently executed poorly. A professional trouser hem must not only be the correct length but must also maintain the original drape and break of the fabric. The “break” refers to the fold or creasing of the fabric above the shoe, which dictates the formality and style of the trousers.
When modifying trouser leg length, first determine the correct break while wearing the exact shoes that will be paired with the trousers. Mark the pinning line at the back of the heel. Once marked, lay the trousers flat and ensure both legs are perfectly symmetrical. A crucial step that many home tailors skip is recreating the original hem finish. If the trousers originally featured a blind hem, you must use the blind hem foot on your sewing machine or hand-sew a blindstitch. If dealing with denim or casual chinos, a heavy-duty topstitching thread is required to match the manufacturer’s aesthetic.
| Trouser Style | Recommended Break | Hemming Technique | Thread Type |
|---|---|---|---|
| Formal Suit Trousers | Slight to Medium Break | Hand Blindstitch or Machine Blind Hem | Fine Polyester/Silk |
| Casual Chinos | Medium to Full Break | Double-Fold Machine Topstitch | Standard All-Purpose |
| Denim Jeans | Full Break or Cuffed | Original Hem Retention (Euro Hem) | Heavy-Duty Topstitch |
| Cropped Trousers | No Break (Above Ankle) | Deep Double-Fold or Blind Hem | Standard All-Purpose |

Precision Tailoring: Navigating Curves, Corners, and Fit
The human body is an intricate landscape of three-dimensional curves and angles. Consequently, flat pieces of fabric must be expertly manipulated to contour seamlessly over this topography. Precision tailoring is the advanced discipline of transforming two-dimensional textiles into a structural, form-fitting masterpiece. This involves mastering the geometry of sewing—specifically, the flawless execution of curves and sharp corners, which are notorious for causing puckering, bulk, and distortion if handled incorrectly.
Sewing Perfect Curves and Corners: Pro Tips
Curves and corners are the ultimate test of a tailor’s precision. Whether you are constructing a scalloped collar, a princess seam, or a sharp lapel, the tension of the seam allowance must be released to allow the fabric to lay flat once turned right-side out. The fundamental rule for sewing curves is understanding the difference between an inward (concave) curve and an outward (convex) curve.
For convex curves, such as the outer edge of a Peter Pan collar, the seam allowance contains more fabric than the seam line itself. When turned right-side out, this excess fabric bunches up, creating a lumpy, unprofessional edge. To resolve this, you must cut small V-shaped notches out of the seam allowance, being incredibly careful not to snip through the stitch line. This removes the bulk and allows the curve to lay perfectly flat. Conversely, for concave curves, such as a neckline, the seam allowance is shorter than the seam line. When turned, the fabric will pull and stretch tightly. The solution here is to clip straight into the seam allowance at regular intervals, stopping just a millimeter short of the stitches. This allows the fabric to spread and relax.
Sharp corners, such as those found on a shirt collar or a square pocket, require a different approach. Never pivot your needle precisely on the corner point. Instead, sew one or two stitches diagonally across the point. This microscopic blunting of the corner provides room for the seam allowance to tuck inside. Before turning the corner out, trim the tip of the seam allowance diagonally, and then taper the adjacent sides. Use a specialized point turner—never a sharp scissor or pen—to gently push the corner out to a crisp, sharp point.
The Whole Process of Tailoring: Making Each Piece Fit
Exquisite tailoring is not a single action but a comprehensive, multi-stage process. It begins long before the needle pierces the fabric. The process initiates with the preparation of the textile—pre-washing, pressing, and identifying the grainline. Cutting off-grain will result in a garment that perpetually twists and hangs incorrectly on the body.
The next critical phase is the transfer of pattern markings. Darts, pleats, and match points must be marked with absolute precision using tailor’s tacks or tracing wheels. During construction, the iron is just as important as the sewing machine. The golden rule of tailoring is “press as you sew.” Every single seam must be pressed flat to meld the stitches into the fabric, and then pressed open or to the side over a tailor’s ham or seam roll to mold the garment into its three-dimensional shape. Basting is another non-negotiable step in high-end tailoring. Hand-basting complex intersections or slippery fabrics ensures that the layers do not shift during final machine stitching, guaranteeing that seams align perfectly and the final fit is completely exquisite.

Decorative Mastery: Beads, Sequins, and Handmade Lace
Once the structural foundation of a garment is solidified, the focus can shift to the realm of haute couture embellishments. Decorative mastery involves the painstaking application of beads, sequins, and the delicate integration of handmade lace. These elements transform a well-made garment into a breathtaking work of wearable art. However, applying heavy embellishments or fragile lace requires specialized techniques to ensure that the garment remains structurally sound, washable, and comfortable against the skin.
Dazzling Tips for Easily Sewing Beads and Sequins
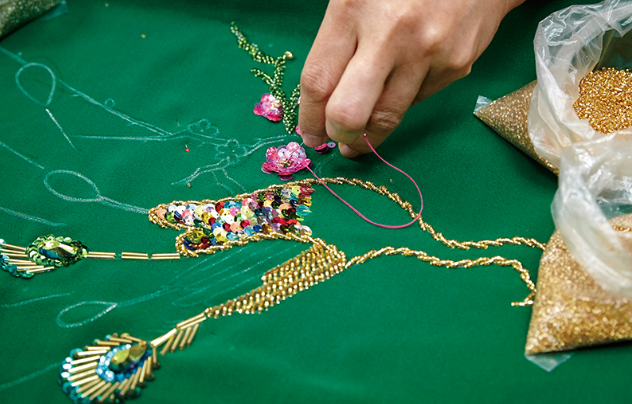
Beadwork and sequin application are labor-intensive processes that demand a strategic approach to prevent thread breakage and ensure longevity. The most critical factor is the choice of thread. Standard cotton thread will quickly degrade under the friction of glass beads or sharp sequin edges. Instead, utilize a specialized, heavy-duty nylon or a wax-coated silamide thread, which offers superior tensile strength and resistance to abrasion.
When applying sequins in a continuous line, the overlapping method is the industry standard. Bring the needle up through the fabric, thread a sequin onto the needle, and slide it down. Insert the needle back into the fabric right at the edge of the sequin. Bring the needle up again slightly ahead of the first sequin, thread the next one, and allow it to overlap the first by exactly half. This creates a seamless, snake-like scale effect that completely hides the thread. For heavy beadwork, it is essential to use a tambour hook or a fine beading needle. Always anchor your thread securely with a double knot at the beginning and end of a section. If you are creating a dense cluster of beads, stitch them down individually or in pairs; stringing too many beads on a single stitch will cause them to droop and snag during wear.
Handmade Lace Sewing: Exquisite and Beautiful
Incorporating handmade lace into a garment is a delicate procedure. Lace is inherently fragile, characterized by its open, net-like structure. Sewing lace requires techniques that secure the motif without crushing its delicate texture or creating bulky, visible seams.
When joining two pieces of lace, a standard straight seam is unacceptable, as it will create a harsh, visible line that disrupts the organic pattern of the lace. Instead, employ the appliqué seam method. Overlap the two pieces of lace, aligning the motifs as closely as possible. Using a fine silk thread and a very narrow, short zigzag stitch, sew meticulously around the outline of the dominant floral or geometric motifs. Once secured, use sharp appliqué scissors to carefully trim away the excess underlying mesh from the back, and the overlapping mesh from the front. The resulting seam will be virtually invisible, maintaining the illusion of a continuous, unbroken lace fabric. When attaching lace to a solid fabric, such as a bodice or hemline, baste it in place first, then use a tiny fell stitch or a narrow machine zigzag to secure the edges seamlessly.

Troubleshooting and Correction: Fixing Crooked Stitches
Even the most experienced master tailors encounter errors during the construction process. The true mark of a professional is not the absence of mistakes, but the ability to expertly troubleshoot and seamlessly correct them. Crooked stitches, whether executed by hand or machine, compromise both the aesthetic beauty and the structural integrity of a garment. Understanding the root causes of these deviations and mastering the techniques for invisible correction are vital skills for any serious sewist.
A Complete Guide to Hand Sewing Correction
Hand sewing is an organic process, and maintaining a perfectly straight line requires immense muscle memory and concentration. When hand stitches go awry, the immediate reaction is often to rip out the entire line and start over. However, strategic correction can save hours of labor while preserving the fabric’s integrity.
If you discover that your hand-sewn running stitch or backstitch has veered off the marked seam line, the first step is to assess the severity. If the deviation is minor (less than a millimeter) and located in an inconspicuous area, it may be left alone, as over-manipulating delicate fabrics can cause permanent needle holes. However, if the crooked stitches are highly visible or affect the fit, correction is necessary. Use a fine seam ripper or a sharp pair of embroidery scissors to carefully snip the thread every third or fourth stitch. Gently pull the thread out using tweezers to avoid distorting the fabric yarns. Once the crooked section is removed, gently massage the fabric on the bias to close the needle holes. Re-mark your seam line using a water-soluble pen or tailor’s chalk. When re-sewing, do not simply try to eyeball the straight line; use a physical guide. You can apply a strip of low-tack painter’s tape along the seam line and stitch exactly along its edge, ensuring absolute precision. Additionally, ensure that your fabric is properly tensioned in an embroidery hoop or pinned securely to a tailor’s ham, as sewing slack fabric is the primary cause of wandering hand stitches.
Frequently Asked Questions (FAQ)
- Q1: Why is my sewing machine skipping stitches when I sew over thick seams?
- Skipped stitches over thick seams occur because the presser foot becomes unlevel, causing the needle to deflect and miss the bobbin hook. To correct this, use a “jean-a-ma-jig” or a folded piece of scrap fabric placed under the back of the presser foot as you approach the thick seam. This levels the foot, allowing the needle to penetrate straight down and properly form the stitch.
- Q2: What is the best way to prevent puckering when sewing lightweight fabrics like chiffon?
- Puckering on lightweight fabrics is usually caused by incorrect tension or a needle that is too dull or too large. Switch to a Microtex or sharp needle (size 60/8 or 70/10). Lower your upper thread tension slightly, and use a shorter stitch length (around 1.5mm). Additionally, holding the fabric taut from both the front and back of the machine while stitching will help prevent the fabric from being dragged down into the needle plate.
- Q3: How do I choose the right needle for sewing beads and sequins?
- You must use a specialized beading needle, which is exceptionally long, thin, and flexible, allowing it to pass through the tiny holes of glass beads multiple times. English beading needles in sizes 10 to 12 are standard for most embellishment work. Ensure you pair this with a strong, fine thread like silamide or conditioned nylon to prevent the sharp edges of the beads from fraying the thread.
- Q4: Can I alter the leg length of trousers that have a factory-distressed hem?
- Yes, you can maintain the original distressed look by using the “Euro Hem” or original hem method. This involves folding the jeans up to the new desired length, right sides together, and stitching a new seam directly below the bulky original hem line. You then
Sewing workspace note: This guide is educational craft information for general readers. Needles, blades, hot irons, steam, motors, cords, dyes, adhesives, and heavy equipment can create safety risks. Follow manufacturer instructions, test materials first, and consult qualified repair or safety professionals when tools or machines behave unexpectedly.