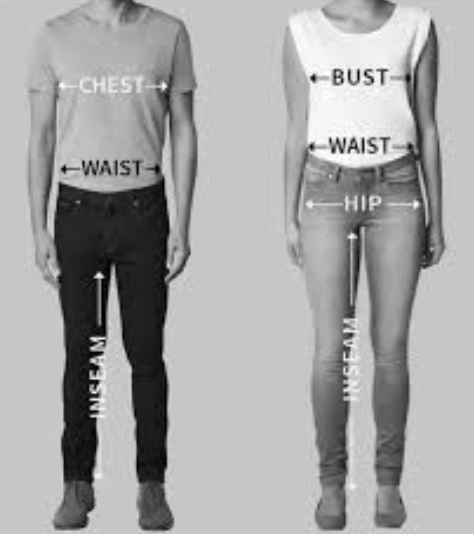
There’s a unique frustration that comes with finding a piece of clothing you love, only to discover it doesn’t fit quite right. A shirt that’s too boxy, pants that are too long, or a waistband that gaps—these small imperfections can relegate a garment to the back of the closet. But what if you could solve these problems yourself? Basic clothes tailoring is a powerful skill that not only saves you money but also empowers you to create a wardrobe that feels custom-made. It’s a sustainable practice that extends the life of your clothes and boosts your confidence. This guide will walk you through the foundational knowledge, essential tools, and core techniques to start altering your own clothes for a perfect fit.
The Foundational Principles of Garment Tailoring
Before you make the first cut, understanding the “why” behind tailoring is crucial. Successful alterations are about more than just sewing a straight line; they involve respecting the garment’s original construction and the properties of its fabric.
Understanding Fit, Drape, and Silhouette
These three concepts are the pillars of a well-fitting garment. “Fit” refers to how closely the clothing follows the contours of your body. “Drape” is how the fabric hangs and moves. “Silhouette” is the overall shape or outline the clothing creates. A good alteration enhances all three. For example, taking in the side seams of a shirt doesn’t just make it tighter (fit); it refines its shape (silhouette) and can improve how the fabric falls (drape).
The Importance of Fabric Type
Different fabrics behave in vastly different ways. Woven fabrics like cotton, linen, and denim have no natural stretch, making them straightforward for structural changes like hemming. Knit fabrics, such as jersey or spandex blends, are stretchy and require specific needles (ballpoint) and stitches (zigzag or stretch stitch) to prevent threads from snapping when the fabric moves. Always consider the fabric before planning an alteration.

Assembling Your Essential Home Tailoring Toolkit
You don’t need a professional studio to start tailoring, but having the right tools makes the job infinitely easier and more precise. Investing in quality basics will pay dividends in the quality of your work. Here is a checklist of essential items for your kit.
- Sewing Machine: While not strictly necessary for all tasks, a basic sewing machine dramatically speeds up the process and provides stronger seams. Look for one with straight and zigzag stitch capabilities.
- Fabric Shears: A pair of sharp scissors dedicated *only* to cutting fabric. Using them on paper or other materials will dull the blades quickly.
- Measuring Tape: A flexible tailor’s tape is essential for taking accurate body and garment measurements.
- Seam Ripper: This small, sharp tool is your best friend for undoing stitches cleanly and without damaging the fabric. Mistakes happen, and a seam ripper makes them easy to fix.
- Pins and Pin Cushion: Straight pins are used to hold fabric in place before and during sewing. A magnetic pin holder or wrist cushion keeps them handy.
- Needles: You’ll need a variety of hand-sewing needles and machine needles appropriate for different fabric types (e.g., universal, ballpoint for knits, denim for heavy fabrics).
- Quality Thread: All-purpose polyester thread is a versatile starting point. Try to match the thread color as closely as possible to your garment.
- Iron and Ironing Board: Pressing your seams as you work is non-negotiable. It sets stitches, creates crisp edges, and is the true secret to a professional-looking finish.

Core Technique #1: Mastering the Perfect Hem
Hemming pants is one of the most common and rewarding alterations. A proper hem can completely change the look of a pair of trousers, making them fall perfectly over your shoes.
Step 1: Accurate Measurement and Marking
Put on the pants with the shoes you intend to wear with them. Stand straight and have a friend or use a full-length mirror to pin the hem to the desired length. Ensure the hem is parallel to the floor. Once you’re happy with one leg, take the pants off, lay them flat, and measure from the original hem to your pin. Use this measurement to mark and pin the other leg for perfect symmetry.
Step 2: Preparing and Pressing the New Hem
Remove the original hem using a seam ripper. Trim the excess fabric, leaving about 1 to 1.5 inches for the new hem allowance. Fold the raw edge up by about a half-inch and press it with an iron. Then, fold it up again to your marked hemline and press firmly. This double-fold technique encases the raw edge and prevents fraying.
Step 3: Sewing the Hem
For a sturdy, visible finish (common on jeans), use a sewing machine with a straight stitch. For dress pants where you want an invisible finish, use a blind hem stitch on your machine or sew it by hand using a blind stitch, catching only a single thread of the outer fabric with each stitch.
Core Technique #2: Taking in a Shirt for a Flattering Fit
A boxy shirt or dress can be transformed by simply taking in the side seams. This alteration creates a more defined waist and a tailored silhouette.
The Pinning Process: A Step-by-Step Guide
Turn the shirt inside out and put it on. Stand in front of a mirror and pinch the excess fabric along the side seams, from the armpit down to the hem. Use pins to secure the fabric along the line you want your new seam to be. Be careful not to pin it too tightly; you should still be able to move comfortably. Remove the shirt carefully.
Sewing and Finishing the Seam
Use a ruler or measuring tape to smooth out the pinned line into a gentle curve. Mark this new seam line with tailor’s chalk. Sew along your marked line using a straight stitch, backstitching at the beginning and end to secure it. Try the shirt on again to check the fit before trimming the excess fabric. Once you’re satisfied, trim the excess fabric to about a half-inch from the new seam and finish the edge with a zigzag stitch or serger to prevent fraying.
Core Technique #3: Adjusting Waistbands on Pants and Skirts
A gaping waistband is a common fit issue, especially for those with a smaller waist-to-hip ratio. A simple way to fix this is by adding two small darts to the back of the waistband.
Procedure for a Center-Back Adjustment
Try on the pants and pinch the excess fabric together at the center back of the waistband. This will show you how much you need to take in. Let’s say it’s 2 inches. Take the pants off. Use a seam ripper to carefully open the top and bottom seams of the waistband at the center back for a few inches. Cut the waistband at the center back. Overlap the two new ends by the amount you needed to take in (2 inches) and pin them. Sew them together securely. Now, you’ll have excess fabric in the pants just below the waistband. Create two small, symmetrical darts to ease this fabric in. Finally, reattach the waistband to the pants, trimming any excess waistband length before you do.
| Alteration Task | When to DIY | When to See a Professional Tailor |
|---|---|---|
| Hemming Pants/Skirts | Simple cotton or denim fabrics with a straight hem. | Delicate fabrics (silk, chiffon), vented or flared hems, or suit trousers. |
| Taking in Side Seams | Unlined cotton shirts or simple dresses. | Lined garments, jackets with complex construction, or delicate fabrics. |
| Adjusting a Waistband | Simple darts or elastic adjustments on casual pants or skirts. | Jeans with rivets, formal trousers, or complex waistband reconstruction. |
| Replacing a Zipper | Simple zippers on skirts or pillows. | Invisible zippers, zippers on jackets, or fly front zippers on pants. |
Frequently Asked Questions (FAQ)
- Can I tailor clothes without a sewing machine?
- Absolutely. Many basic alterations, especially hemming, were done by hand for centuries. Hand sewing can provide more control and an invisible finish, particularly with the blind hem stitch. While slower, it’s a perfectly valid and high-quality method for beginners who aren’t ready to invest in a machine.
- What is the hardest part of tailoring for beginners?
- The most challenging aspect for beginners is often accurate measuring and pinning. Achieving a symmetrical and even result requires patience. It’s easy to pin something while you’re wearing it, only to find the line is crooked once laid flat. Always double-check your measurements and markings before cutting or sewing.
- Is it better to buy clothes a size up to tailor them down?
- Generally, yes. It is almost always easier to make a garment smaller than to make it larger. Taking a garment in is straightforward, but letting it out is only possible if there is enough seam allowance, which is often not the case in modern fast-fashion clothing. Buying a size up to fit the largest part of your body (e.g., hips or shoulders) and tailoring the rest is a common and effective strategy.
- What fabrics are easiest for beginners to alter?
- Medium-weight, stable woven fabrics are the most beginner-friendly. Think cotton, chambray, linen, and non-stretch denim. They don’t slip, stretch, or fray excessively, making them easy to cut, pin, and sew. Avoid very slippery fabrics like silk or very stretchy knits until you have more experience.