There is no greater disappointment for a sewer than spending hours cutting and stitching, only to find the final garment simply doesn’t fit or come together correctly. Pieces don’t align, seams pucker, and the finished project looks homemade in the worst way. The root cause often isn’t complex; it boils down to two fundamental, yet frequently overlooked, pillars of garment construction: precise fabric marking and consistent seam allowance. Mastering these two skills is the true secret to transforming your sewing from frustrating guesswork to a rewarding, professional-quality craft. This guide will provide a comprehensive deep-dive into the tools, techniques, and principles you need to ensure every piece you create is a perfect fit.
The Foundation of Precision: Why Fabric Marking Matters
Fabric marking is the crucial process of transferring pattern symbols—like darts, pleats, buttonholes, and notches—from your paper pattern onto your fabric. These marks are the roadmap for your sewing machine. Without them, you’re essentially sewing blind. A tiny error of just 1/8th of an inch in marking a dart can be magnified across the garment, leading to significant fit issues. This is the “compounding error” principle in sewing: small inaccuracies at the start lead to large, unfixable problems at the end. Proper marking ensures that corresponding pieces, like a sleeve and an armhole, will align perfectly during construction, which is non-negotiable for professional results.
Understanding the “Why” Behind the Marks
It’s not just about drawing lines. Each mark has a specific purpose that dictates the structure and shape of the final garment:
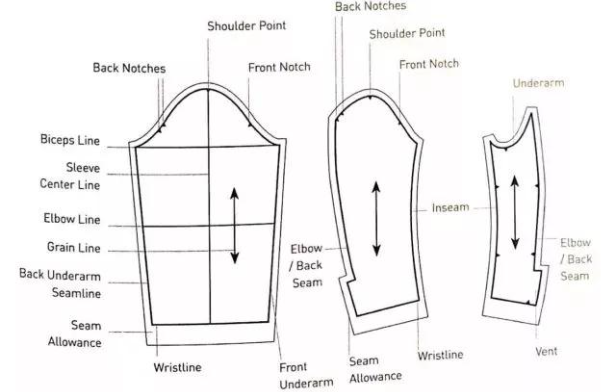
- Notches: These small clips or triangles along the cutting line are essential for matching seams correctly, especially on long or curved edges.
- Dots and Squares: These often indicate pivot points, the start/end of stitching, or placement for details like pockets or zippers.
- Darts and Pleats: These are the most critical markings for shaping a flat piece of fabric to fit the three-dimensional curves of the human body. Inaccuracy here directly translates to poor fit.

Choosing Your Fabric Marking Tools: A Complete Guide
The right tool for the job can make all the difference in accuracy and ease. Not all marking tools are suitable for all fabrics. Using a tool that is too thick, bleeds, or is difficult to remove can ruin your project before you even start sewing. It’s essential to test your marking tool on a scrap of your project fabric first to ensure it creates a clear, fine line and can be completely removed without a trace.
Comparison of Common Fabric Marking Tools
To help you choose, here is a breakdown of the most popular marking tools, their best uses, and their potential drawbacks.
| Marking Tool | Best For | Pros | Cons |
|---|---|---|---|
| Tailor’s Chalk | Wovens, dark fabrics, woolens | Easy to remove, comes in multiple colors, creates a sharp edge when fresh. | Can crumble, lines can be thick, may brush off too easily. |
| Water-Soluble Pen | Light to medium-colored wovens and knits | Creates a fine, precise line. Easily removed with a dab of water. | Must be completely removed before ironing, as heat can set the ink permanently. |
| Heat-Erasable (Frixion) Pen | Quilting, projects not exposed to cold | Very fine, crisp line. Disappears instantly with the heat of an iron. | Marks can reappear if the fabric is exposed to freezing temperatures. Not ideal for all garments. |
| Tracing Paper & Wheel | Most fabric types, especially for transferring multiple lines at once | Transfers pattern lines and markings simultaneously. Good for long, straight lines. | Can be difficult to see on patterned fabrics. Serrated wheels can damage delicate fabrics. |
Mastering Seam Allowance for a Perfect Fit
Seam allowance is the area between the fabric’s raw edge and the stitching line. Commercial patterns almost universally use a 5/8 inch (1.5 cm) seam allowance, but this is not an arbitrary number. This width provides enough fabric to press the seam open flat, which reduces bulk and creates a professional finish. It also allows for minor fitting adjustments. The single most important rule of seam allowance is consistency. If you sew one seam at 5/8″ and the connecting seam at 1/2″, your pieces will not align, and the garment’s final dimensions will be incorrect.
How to Ensure Seam Allowance Accuracy
Your sewing machine is your primary tool for maintaining a consistent seam allowance. Here’s a checklist for accuracy:
- Identify the Guide Lines: Familiarize yourself with the seam allowance guide lines etched on your machine’s needle plate.
- Use Seam Guide Tape: For better visibility, place a strip of washi tape or a magnetic seam guide on your machine at the correct measurement.
- Keep Your Eye on the Guide: As you sew, watch the edge of your fabric against the guide, not the needle. This ensures your stitching line remains parallel to the edge.
- Measure and Check: Periodically, stop and measure your seam allowance with a seam gauge or small ruler to confirm you are on track.
Pro Tips for Flawless Garment Assembly
Beyond the basics of marking and seam allowance, several expert techniques can elevate the quality of your construction and prevent common issues.
Expert Advice for Professional Results
- Press As You Go: Never sew across an unpressed seam. Pressing each seam after it’s stitched (first closed to set the stitches, then open or to one side) is the number one habit that separates amateur from professional-looking garments.
- Staystitching is Not Optional: Staystitching is a line of regular stitches sewn just inside the seam allowance on curved or bias-cut edges, like necklines or armholes. It prevents the fabric from stretching out of shape during handling and construction.
- Clip and Notch Curves: To help curved seams lie flat, you must clip into the seam allowance on concave (inward) curves and cut notches (small triangles) out of the seam allowance on convex (outward) curves.
- Grade Your Seams: In areas with multiple layers of fabric, like collars or cuffs, grade the seam allowances by trimming each layer to a slightly different width. This reduces bulk and creates a sharp, flat edge when turned.
Frequently Asked Questions (FAQ)
- Why do my seams pucker after sewing?
- Puckering is often caused by incorrect thread tension on your sewing machine. It can also be due to using a stitch length that is too short for the fabric weight, or by stretching the fabric as you feed it through the machine. Always test your settings on a scrap piece of fabric first.
- Can I just use a regular pencil for marking my fabric?
- It is highly discouraged. Pencil graphite can be very difficult to remove from fabric fibers and may leave a permanent grey smudge. Always use a tool specifically designed for fabric that is proven to be removable from your specific material.
- How do I accurately mark very dark or black fabrics?
- For dark fabrics, a white or yellow tailor’s chalk pencil is an excellent choice. Alternatively, you can use a tracing wheel with white or light-colored tracing paper. Some brands also make white water-soluble pens specifically for this purpose.
- What does it mean to “true up” pattern pieces?
- “Truing up” means to walk the seam lines of adjoining pattern pieces together before cutting to ensure they are the same length and that any notches align perfectly. This pre-emptive check can save you from discovering a mismatch after the fabric is already cut.
- My cut pieces seem to be different sizes, even though I used the same pattern piece. Why?
- This common issue usually stems from the fabric shifting during cutting. Ensure your fabric is laid out flat and smooth, without any wrinkles or tension. Use plenty of pattern weights or pins, and always cut with a sharp rotary cutter or shears. Inaccurate marking of the cutting line can also be a culprit.