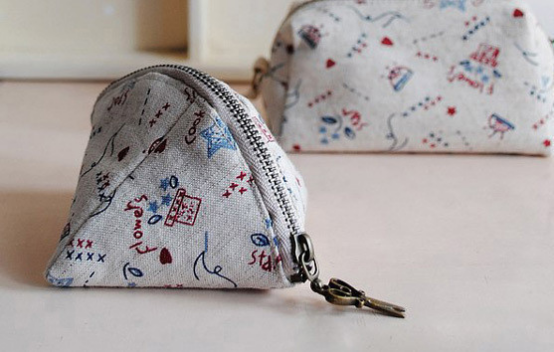
Embarking on your first sewing projects can be an incredibly fulfilling experience, transforming simple fabric into functional and personalized items. This pillar page is meticulously designed for beginners, guiding you through the creation of small, practical accessories such as mini coin purses, handy tissue bags, and indispensable data cable organizers. Beyond just providing instructions, we delve into the foundational skills, essential tools, and detailed steps necessary to ensure your success. You’ll not only learn to sew these specific items but also gain a solid understanding of basic sewing principles that can be applied to countless future projects, fostering creativity and self-sufficiency.
Getting Started with Beginner Sewing Projects
Before you dive into your first stitching adventure, it’s crucial to understand the fundamental aspects of sewing. This includes familiarizing yourself with the basic tools that will become your trusted companions and mastering a few core techniques that form the backbone of almost any sewing project. Laying this groundwork properly will save you frustration and ensure a smoother, more enjoyable crafting experience as you progress from simple cuts to intricate seams.
Essential Sewing Tools and Materials
Having the right tools is paramount for any successful sewing project. While the world of sewing offers an expansive array of gadgets, beginners can start with a focused set of essentials that cover most basic needs. These tools are investments that will serve you well across numerous projects, from simple repairs to crafting complex items.
- Sewing Machine (Optional but Recommended): While hand sewing is possible, a basic sewing machine significantly speeds up the process and provides more consistent stitches. Look for models with simple stitch options like straight and zigzag.
- Fabric Shears: Dedicated fabric scissors are incredibly sharp and should only be used for fabric to maintain their edge. Using them on paper dulls them quickly.
- Pins and Pin Cushion: Pins hold fabric layers together before sewing, preventing shifting. A pin cushion keeps them organized and safe.
- Measuring Tape/Ruler: Essential for accurate cutting and marking fabric, ensuring your pieces are the correct size.
- Fabric Marker/Chalk: Used to draw cutting lines or markings directly on fabric that can be easily removed.
- Seam Ripper: Every sewer makes mistakes! A seam ripper is a small, indispensable tool for carefully undoing stitches without damaging the fabric.
- Thread: All-purpose polyester thread is a good starting point, suitable for most fabrics. Choose colors that match or complement your fabric.
- Iron and Ironing Board: Pressing seams flat as you go is a secret to professional-looking results. It helps fabric lie correctly and makes sewing easier.
Beyond these tools, the choice of fabric is critical. For beginners, opt for non-stretchy, medium-weight cotton fabrics. They are easy to cut, pin, and sew, making them forgiving for learning new techniques. Avoid slippery silks or stretchy knits until you’ve built confidence.
Basic Sewing Stitches and Techniques
Understanding a few fundamental stitches and techniques will empower you to tackle a wide variety of projects. These are the building blocks upon which more complex sewing skills are developed, and mastering them early will give you a strong foundation.
- Straight Stitch: The most common stitch, used for joining two pieces of fabric. On a machine, you’ll adjust stitch length; for hand sewing, aim for even, consistent stitches.
- Backstitch: Used at the beginning and end of a seam to secure the stitches and prevent them from unraveling. It involves stitching backward a few stitches.
- Hemming: The process of folding and sewing the raw edge of fabric to create a neat, finished edge. This prevents fraying and gives a professional look.
- Seam Allowance: The distance between the raw edge of the fabric and the stitch line. Consistent seam allowance is vital for accurate project dimensions. Most patterns use a 1/4 inch or 1/2 inch seam allowance.
- Pressing: Not just ironing! Pressing involves lifting and placing the iron onto the fabric, rather than sliding it, to flatten seams and shape fabric. Always press as you sew.
Practice these techniques on scrap fabric before starting your main project. This builds muscle memory and helps you get a feel for your machine or hand sewing rhythm. Consistency in your stitches and cuts is key to achieving a polished final product.

Crafting Your First Mini Coin Purse
A mini coin purse is an excellent first project for beginners. It’s small, requires minimal fabric, and introduces basic sewing concepts like cutting, stitching straight lines, and turning fabric right side out. This project is not only satisfying to complete but also results in a practical item perfect for organizing loose change, small earbuds, or even tiny trinkets. The process is straightforward, focusing on building foundational skills without overwhelming complexity.
Materials Needed for a Mini Coin Purse
Gathering all your materials before you begin ensures a smooth and uninterrupted crafting process. For a mini coin purse, you’ll need just a few key items, making it an economical and accessible project for anyone starting out.
- Main Fabric: A small piece (e.g., 8×8 inches or 20×20 cm) of medium-weight cotton fabric. Choose a fun print or a solid color you love.
- Lining Fabric: An equally sized piece of cotton fabric for the inside of the purse. This can be coordinating or contrasting.
- Zipper: A small zipper, typically 4-6 inches (10-15 cm) long, depending on your desired purse size. A nylon zipper is easier for beginners to work with.
- Matching Thread: Polyester all-purpose thread that matches your main fabric or zipper.
- Basic Sewing Tools: Fabric shears, pins, measuring tape, fabric marker, and a sewing machine (with a zipper foot if available).
Consider pre-washing and ironing your fabric before cutting. This helps prevent shrinkage after your purse is made and makes the fabric easier to work with, ensuring a neat and crisp finish for your final product.
Step-by-Step Guide to Sewing a Coin Purse
Follow these detailed steps to construct your very own mini coin purse. Take your time with each stage, paying attention to accuracy in cutting and stitching for the best results.
- Cut Fabric Pieces: Cut two rectangles from your main fabric and two rectangles from your lining fabric. A common beginner size is 4 inches wide by 5 inches tall (10×12.5 cm), but you can adjust this.
- Attach Zipper to Main Fabric:
- Place one main fabric piece right side up.
- Lay the zipper right side down along the top edge of the main fabric, aligning the raw edges.
- Place one lining fabric piece right side down on top of the zipper, aligning all three raw edges.
- Pin through all layers. Using a zipper foot on your machine, sew a straight stitch close to the zipper teeth.
- Flip the fabrics away from the zipper and press the seams flat.
- Attach Zipper to Remaining Fabrics: Repeat the previous step with the remaining main fabric piece and lining fabric piece on the other side of the zipper. Ensure the main fabrics are facing each other and the lining fabrics are facing each other when sewn.
- Assemble the Purse:
- Open the zipper halfway. This is crucial for turning the purse right side out later.
- Align the two main fabric pieces right sides together, pinning around the three raw edges (sides and bottom).
- Align the two lining fabric pieces right sides together, pinning around their three raw edges.
- Sew around the main fabric pieces, leaving a 1/4 inch seam allowance. Do not sew across the zipper ends.
- Sew around the lining fabric pieces, leaving a 1/4 inch seam allowance, but leave a 2-3 inch (5-7.5 cm) opening along the bottom edge of the lining. This opening is for turning.
- Trim and Turn: Clip the corners of both the main and lining fabric sections to reduce bulk. Carefully turn the entire purse right side out through the opening in the lining. Push out all corners gently.
- Close Opening and Finish: Hand stitch or machine stitch the opening in the lining closed. Push the lining into the main purse body. Press the finished coin purse.
Congratulations! You’ve just sewn your first mini coin purse. This project reinforces the importance of seam allowance, working with zippers, and the technique of turning, all fundamental skills for subsequent projects.
Tips for Financial Organization with Your New Purse
While primarily a sewing project, your mini coin purse can play a small role in cultivating better financial habits, especially for managing small, everyday expenses. It encourages mindful spending and organization for loose change.
- Dedicated Change Holder: Use it exclusively for coins, keeping them separate from bills and preventing them from cluttering your main wallet. This makes it easier to use exact change.
- Small Emergency Fund: Keep a few dollars or a small amount of emergency cash in it for unexpected small purchases like a coffee or parking meter.
- Budgeting for Small Treats: Designate it for a specific small indulgence, such as a daily coffee or a weekly snack. Once the money in the purse is gone, that budget item is complete for the day/week.
- Travel Companion: Ideal for holding foreign currency when traveling, keeping it separate from your primary wallet.
By giving your coin purse a specific purpose, you transform it from a simple accessory into a tool that subtly aids in managing small financial transactions, reinforcing good habits even at a micro-level.

Sewing Practical Homemade Tissue Bags
Tissue bags are another fantastic beginner-friendly sewing project. They are quick to make, incredibly practical, and offer a wonderful opportunity to use up fabric scraps. These small pouches are designed to hold a standard packet of pocket tissues, keeping them clean and accessible in your handbag, car, or desk. They make thoughtful, personalized gifts and allow for creative expression through fabric choices. The construction is even simpler than a coin purse, often involving fewer steps and no zippers, making it an ideal confidence booster for new sewers.
Supplies for a DIY Tissue Bag
The beauty of a tissue bag project lies in its simplicity and minimal material requirements. You likely have most of what you need already on hand, making it a great last-minute craft.
- Main Fabric: A rectangular piece of cotton fabric, approximately 6.5 inches by 8.5 inches (16.5 cm by 21.5 cm). This size accommodates most standard pocket tissue packs.
- Matching Thread: All-purpose polyester thread.
- Basic Sewing Tools: Fabric shears, pins, measuring tape, fabric marker, iron, and sewing machine.
- Optional: Small piece of interfacing for added structure, or decorative elements like ribbon or trim.
Choosing a fun, vibrant fabric can really elevate your tissue bag, turning a utilitarian item into a stylish accessory. Consider seasonal prints or patterns that match your personal style.
Simple Instructions for Tissue Bag Creation
Creating a tissue bag is a straightforward process involving a few folds and straight stitches. Pay attention to pressing and accurate measurements for a crisp finish.
- Prepare Fabric: Press your fabric flat. If desired, apply a lightweight fusible interfacing to the wrong side of your fabric for extra body.
- Hem the Short Edges: On both short 6.5-inch edges, fold the raw edge over by 1/4 inch (0.6 cm) towards the wrong side of the fabric and press. Then, fold it over another 1/4 inch and press again. Stitch these hems in place. This creates a neat, finished opening for your tissues.
- Fold and Pin: Lay your fabric piece right side up.
- Take one of the hemmed short edges and fold it inward towards the center by approximately 2.5 inches (6.3 cm).
- Take the other hemmed short edge and fold it inward so that it overlaps the first folded edge by about 1 inch (2.5 cm). The total length of your folded piece should now be around 4.5 inches (11.4 cm). This overlap creates the opening for the tissues.
- Pin the folded layers securely along the long raw edges.
- Sew Side Seams: Stitch down both long raw edges with a 1/4 inch (0.6 cm) seam allowance, backstitching at the beginning and end of each seam to secure.
- Finish Edges (Optional but Recommended): Trim the seam allowances. You can finish these raw edges with a zigzag stitch or an overlocker/serger to prevent fraying.
- Turn and Press: Turn the tissue bag right side out. Use a point turner or a blunt stick to gently push out the corners. Press the entire bag flat, ensuring the opening is crisp.
You now have a functional and stylish tissue bag! Insert a pack of tissues, and it’s ready for use or gifting. This project is excellent for reinforcing straight stitching and hemming techniques.
Personalizing Your Tissue Bags
One of the joys of DIY projects is the ability to customize them. Tissue bags offer ample opportunities for personalization, making each one unique.
- Fabric Selection: Choose fabrics that reflect personality, hobbies, or specific occasions. Think floral prints, geometric patterns, novelty fabrics, or even embroidered linen.
- Embellishments: Before sewing the side seams, you can add small embellishments to the front of the bag. Consider:
- Ribbon or Lace Trim: Sew a strip of decorative ribbon or lace across the front.
- Appliqué: Cut out a shape from a contrasting fabric and stitch it onto the main fabric.
- Embroidery: Hand embroider initials, a small design, or a simple motif.
- Fabric Paint/Markers: Draw or write directly on the fabric for a truly custom touch.
- Contrast Lining: While this project doesn’t typically have a separate lining, you could use a contrasting fabric for the folded edges to add a subtle pop of color when the tissues are pulled out.
- Gift Sets: Create a set of tissue bags in different fabrics to match various outfits or for different family members. Pair them with other small handmade items for a thoughtful gift.
Personalization not only makes your tissue bags more appealing but also allows you to practice more advanced decorative sewing techniques in a small, manageable format.

Organizing with DIY Data Cable Storage Bags
In our increasingly digital world, managing a tangle of data cables, chargers, and small tech accessories can be a constant battle. A handmade data cable storage bag offers an elegant and practical solution. This project is slightly more involved than a tissue bag but still well within a beginner’s reach, introducing concepts like simple closures and potentially multiple compartments. It’s incredibly satisfying to create an item that brings order to digital chaos, and it makes for a highly appreciated gift for tech-savvy friends and family.
What You’ll Need for Cable Organizers
To create a durable and functional cable organizer, selecting the right materials is important. You’ll want fabrics that can withstand a bit of wear and tear, and a reliable closure mechanism.
- Main Fabric: A sturdier cotton fabric like canvas, duck cloth, or a heavier cotton twill. A common size could be two pieces, 8×10 inches (20×25 cm) each, for a basic pouch.
- Lining Fabric: Cotton fabric of similar weight.
- Interfacing (Optional but Recommended): Medium-weight fusible interfacing will give the bag more structure and protection for the cables.
- Closure Mechanism:
- Zipper: A 7-9 inch (18-23 cm) zipper.
- Snap/Velcro: For a flap closure design.
- Drawstring: Requires eyelets or buttonholes, and cording.
- Matching Thread: Strong polyester thread.
- Basic Sewing Tools: Fabric shears, pins, measuring tape, fabric marker, iron, and sewing machine (with zipper foot if using a zipper).
For extra padding, you could even incorporate a thin layer of batting or foam stabilizer between the main fabric and lining, especially if you plan to store more delicate items like external hard drives.
How to Sew a Data Cable Storage Pouch
Let’s outline the steps for a simple zippered pouch, which is versatile for storing various cables and small electronics. This builds upon the zipper technique learned with the coin purse.
- Cut Fabric: Cut two pieces of main fabric and two pieces of lining fabric to your desired pouch dimensions (e.g., 8×10 inches). Cut two pieces of interfacing if using, slightly smaller than your fabric pieces.
- Apply Interfacing (if using): Fuse the interfacing to the wrong side of your main fabric pieces according to the manufacturer’s instructions.
- Attach Zipper:
- Place one main fabric piece right side up.
- Lay the zipper right side down along one 8-inch edge, aligning raw edges.
- Place one lining fabric piece right side down on top of the zipper, aligning all raw edges.
- Pin and sew close to the zipper teeth with a zipper foot.
- Flip the fabrics away from the zipper and press.
- Repeat for Other Side: Repeat step 3 with the remaining main and lining fabric pieces on the other side of the zipper. Ensure main fabrics face each other and lining fabrics face each other.
- Prepare for Assembly: Open the zipper halfway. This is crucial for turning.
- Sew Around:
- Align the two main fabric pieces right sides together, pinning around the three raw edges (sides and bottom).
- Align the two lining fabric pieces right sides together, pinning around their three raw edges.
- Sew around the main fabric pieces with a 1/2 inch (1.2 cm) seam allowance.
- Sew around the lining fabric pieces with a 1/2 inch seam allowance, leaving a 3-4 inch (7.5-10 cm) opening at the bottom of the lining for turning.
- Clip Corners and Turn: Clip the corners of both the main and lining sections to reduce bulk. Carefully turn the pouch right side out through the opening in the lining.
- Close Opening and Finish: Hand stitch or machine stitch the opening in the lining closed. Push the lining into the main pouch body. Press the finished cable organizer.
This zippered pouch is robust and perfect for keeping cables, power banks, and adapters neatly contained, whether at home or on the go. The structure provided by interfacing makes it particularly suitable for tech items.
Creative Variations for Tech Accessories
Once you’ve mastered the basic cable pouch, you can explore various design modifications to suit different needs and aesthetics. These variations allow for greater customization and functionality.
- Divided Pouch: Add interior pockets or dividers to keep specific cables separate. This can be achieved by sewing additional fabric panels into the lining before final assembly.
- Roll-Up Organizer: Instead of a pouch, create a flat fabric piece with multiple pockets and elastic loops, which then rolls up and secures with a tie or snap. This is ideal for a collection of charging cables.
- Padded Sleeves: For larger items like tablets or e-readers, adapt the pouch design with extra padding (quilting batting or foam) and a secure flap closure.
- Transparent Pockets: Incorporate clear vinyl pockets into the design, allowing you to see which cable is where without opening everything.
- External Loops/Handles: Add a small fabric loop or a D-ring to the side seam for attaching to a bag or lanyard, enhancing portability.
Experiment with different fabric combinations, colors, and closure types to create a range of cable organizers that are both practical and visually appealing. These variations not only solve storage problems but also provide excellent opportunities to expand your sewing repertoire.

Advanced Tips for Small Sewing Projects
As you gain confidence with basic projects, you’ll naturally look for ways to improve your technique and tackle more intricate designs. These advanced tips focus on refining your skills, solving common issues, and expanding your creative horizons within the realm of small sewing projects. Moving beyond the initial learning curve involves paying closer attention to details and embracing new challenges.
Troubleshooting Common Sewing Challenges
Even experienced sewers encounter problems. Knowing how to diagnose and fix common issues will save you time and frustration, helping you maintain momentum and improve the quality of your work.
- Skipped Stitches: Often caused by an incorrect needle for the fabric type, a bent needle, or improper threading. Check your needle, rethread, and ensure tension is correct.
- Thread Bunching (Bird’s Nesting): Usually a tension issue, particularly with the bobbin thread. Re-thread both the top thread and bobbin, making sure the bobbin is inserted correctly and the tension is balanced.
- Uneven Seams: Practice maintaining a consistent seam allowance. Use a seam guide on your machine or mark a line on your fabric. Pressing seams as you go also contributes to evenness.
- Fabric Puckering: Can be due to pulling the fabric while sewing, incorrect tension, or using a stitch length that’s too short for the fabric. Let the machine feed the fabric, adjust tension, and increase stitch length.
- Dull Scissors: Using fabric shears on anything other than fabric will quickly dull them. Invest in a good pair and keep them exclusively for fabric. Sharpen them regularly.
Don’t be afraid to use your seam ripper! It’s better to undo a poorly sewn seam and redo it correctly than to let it compromise the entire project. Patience and attention to detail are your best allies in overcoming these hurdles.
Caring for Your Handmade Fabric Items
Once you’ve invested time and effort into creating your beautiful fabric items, proper care will ensure they last longer and retain their appearance. Different fabrics require different care, but some general rules apply.
- Pre-Wash Fabrics: Always pre-wash and dry your fabrics before cutting and sewing, especially if combining different types, to prevent shrinkage and color bleeding after the item is made.
- Gentle Washing: For most cotton items, machine wash on a gentle cycle with cold water. For delicate embellishments or fabrics, hand washing is recommended.
- Mild Detergent: Use a mild, color-safe detergent to preserve fabric colors and integrity.
- Air Drying: Whenever possible, air dry your handmade items to prevent shrinking, fading, and damage to delicate stitches. If using a dryer, use a low heat setting.
- Ironing: Press items while slightly damp or use a steam iron to remove wrinkles. Always check fabric composition for appropriate iron temperatures.
- Spot Cleaning: For small stains, try spot cleaning with a damp cloth and mild soap rather than a full wash.
By following these care instructions, your handmade coin purses, tissue bags, and cable organizers will remain functional and beautiful for years to come, a testament to your crafting skill.
Expanding Your Sewing Skills
The journey of learning to sew is continuous. Once comfortable with the basics, there are numerous avenues to explore to further enhance your abilities and tackle more complex and rewarding projects.
- Explore New Fabrics: Experiment with slightly more challenging fabrics like fleece, denim, or even faux leather. Each fabric type offers unique properties and requires different handling techniques.
- Learn New Techniques: Dive into techniques like quilting, adding piping, installing magnetic snaps, creating buttonholes, or working with curves. These open up a world of new project possibilities.
- Follow Patterns: Start using commercial sewing patterns. They offer precise instructions and measurements for a vast range of items, from garments to home decor.
- Join a Sewing Community: Connect with other sewers online or in person. Sharing tips, asking questions, and getting inspiration from others can significantly accelerate your learning.
- Invest in Tools: As your skills grow, consider investing in specialized tools like a rotary cutter and mat for quicker, more accurate cuts, or an overlocker/serger for professional-looking seam finishes.
Remember that every project, whether a success or a learning experience, contributes to your overall skill set. Embrace the process, enjoy the creativity, and continue to challenge yourself with new and exciting sewing adventures.
Frequently Asked Questions (FAQ)
- Q1
Sewing workspace note: This guide is educational craft information for general readers. Needles, blades, hot irons, steam, motors, cords, dyes, adhesives, and heavy equipment can create safety risks. Follow manufacturer instructions, test materials first, and consult qualified repair or safety professionals when tools or machines behave unexpectedly.